If you’re completely new to guitaleles, I guess your immediate impressions of the GL1 are likely to range from; “is this a toy guitar?” or “is this some sort of weird ukulele with too many strings?”.
Adding to the confusion, in the case of naming the GL1, Yamaha have arrived at a portmanteau word encompassing the two instruments from which it draws its inspiration, but excluding the ‘r’. So nobody knows how to pronounce it, either!
I own a GL1 and really like it, so on to the matter in hand: Here’s a complete guide to everything you’ll need to know about the Yamaha GL1.
Covered in this Article:
First Impressions & Appearance
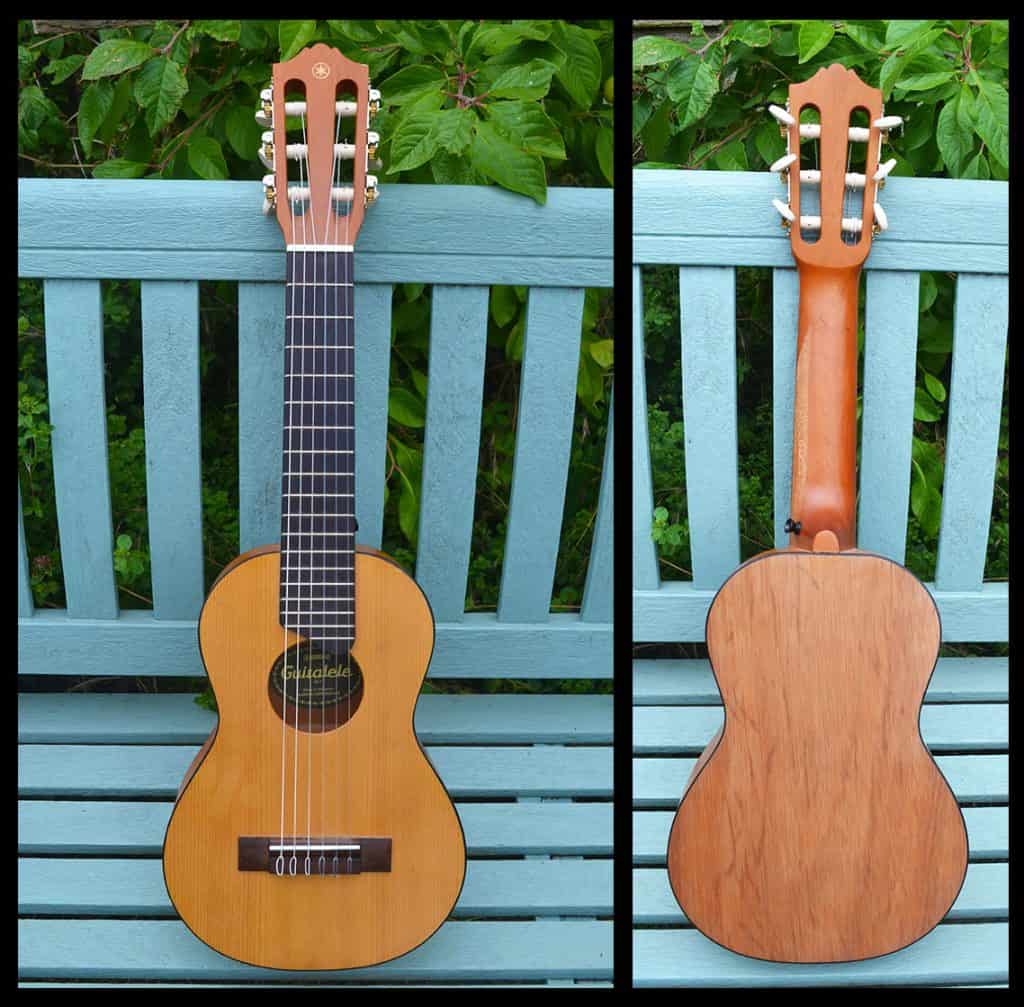
Physically, the GL1 is about the size of a standard tenor ukulele, albeit with a wider fingerboard and neck to accommodate the two additional lower strings.
The construction is impressively well made for a relatively lower-priced instrument, although you could describe the appearance as somewhat plain.
If you want a thing of beauty, this won’t exactly rock your world, but saying that, it isn’t unattractive either, just lacking in a few ornamental touches you might find on a more expensive instrument.
To my way of thinking, Yamaha could have pushed the boat out a little and included a simple rosette design around the soundhole to set the instrument off a little more, but if aesthetics don’t figure highly on your list of priorities, it’s not exactly going to be a deal breaker.
My model I’m reviewing here is the standard ‘natural’ wood finish, but if you’re looking for something a little more eye catching, it does come in three alternative finishes; Black, Persimmon Brown and Tobacco Brown Sunburst.
It would be remiss of me not to mention that I have read about some issues with paint chipping or flaking off on the painted models, but wouldn’t like to be overly critical in this respect without experiencing this fault myself. Obviously, with the natural wood model, this is not going to be an issue.
Yamaha GL1 Action and Tuners
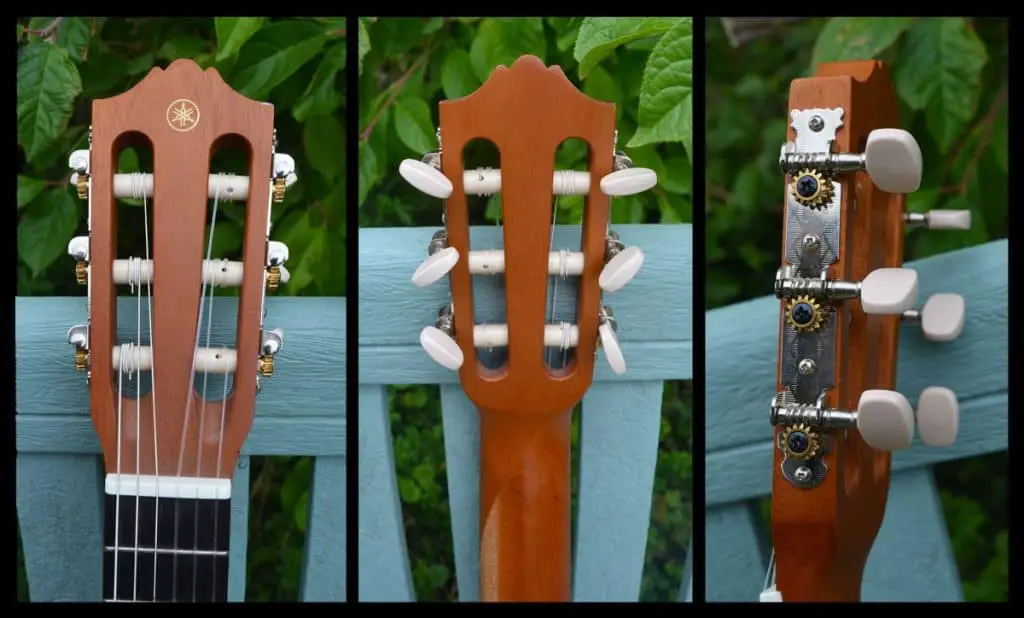
The GL1 tuners, although functional in appearance, seem to be very solid and don’t feel either too loose or too tight.
As expected from a long-established company like Yamaha, this often-overlooked aspect of instrument construction is taken seriously here, so you’re unlikely to find your guitalele going out of tune on a regular basis, except during the bedding-in period of installing a new set of strings.
Too often, poor quality tuners or machine heads let down an otherwise decent instrument, rendering it unusable for sustained periods of time. This is not the case with the GL1.
The intonation for a lower-priced instrument is surprisingly good, so you won’t find yourself going badly out of tune the higher up the fingerboard you go.
For me, though, the action could be a little lower, which will make it a bit more playable beyond the fifth fret.
It always frustrates me that a simple design feature like manufacturing a shallower nut and saddle are often overlooked.
In this case, the intonation isn’t really adversely affected by the action, but in many lower-end instruments, it renders them largely unplayable beyond the first three frets.
At the end of this article I give step by step instructions on how to do simply DIY saddle adjustment if you’re interested in reducing the saddle height of the GL1.
How to Tune the Yamaha GL1 Guitalele
Because of its short scale, the GL1 should ideally be tuned to A-D-G-C-E-A, which is akin to a guitar capoed on the 5th fret (or a fourth above a standard guitar).
This tuning is also associated with the requinto, a type of short scale guitar.
Some players have managed to find suitable string combinations to tune down to standard guitar tuning (E-A-D-G-B-E), but in my opinion, this defeats the object of buying a guitalele, which has its own unique sound due to the higher tuning configuration.
You may also need to re-slot the nut on a couple of strings to accommodate the heavier gauges.
If you want to go down this route, La Bella sell a set of strings suitable for ¼ size guitars (Fractional FG114) which are supposed to offer a decent amount of tension on the shorter scale instrument.
In the following diagrams, I’ve detailed the GL1 guitalele’s fingerboard and tuning layout:
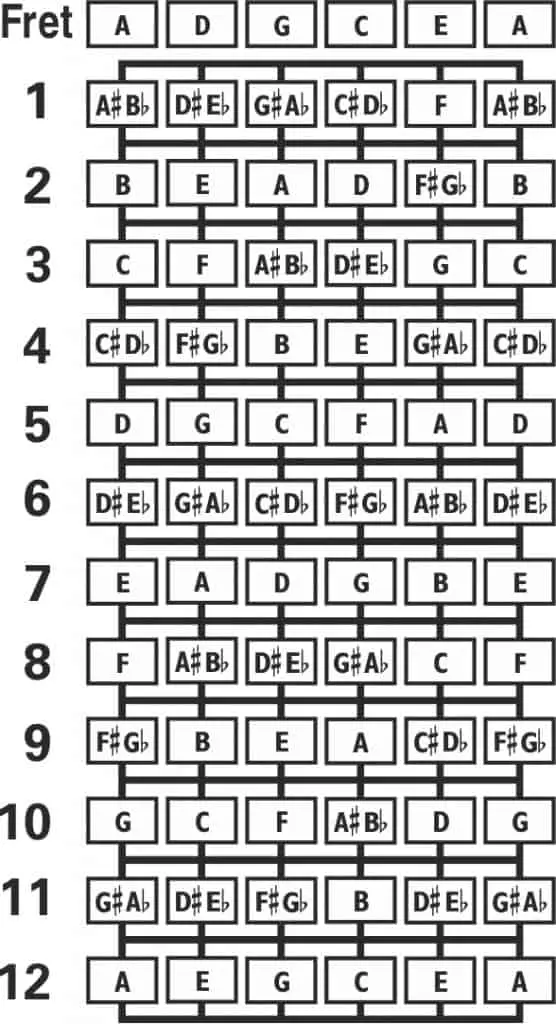
Tuning the GL1 guitalele to itself (by fretting at given intervals along the fingerboard):

GL1 Guitalele Staff Notation:
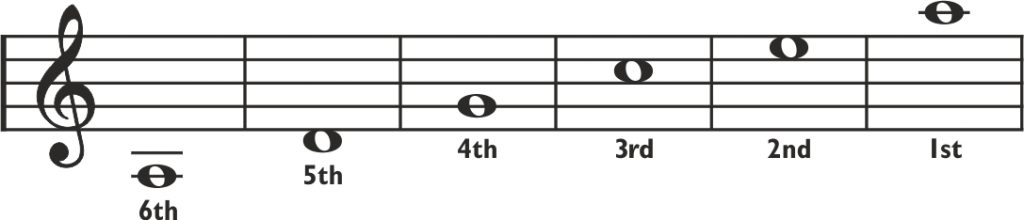
And finally, here’s how to tune the GL1 Guitalele to a guitar or piano:
| GL1 Guitalele | Guitar | Piano |
|---|---|---|
| 1st string (A) | 1st string (E) fretted at the 5th fret | 1st A above middle C |
| 2nd string (E) | 1st open string (E) | 1st E above middle C |
| 3rd string (C) | 2nd string (B) fretted at the 1st fret | Middle C |
| 4th string (G) | 3rd open string (G) | 1st G below middle C |
| 5th string (D) | 4th open string (D) | 1st D above middle C |
| 6th string (A) | 5th open string (A) | 2nd A below middle C |
How Does The Yamaha GL1 Sound?
We’ve now covered the action and tuners, but most important of all, what does it sound like? And could such a small instrument be capable of producing a decent sound?
To Yamaha’s credit, they’ve managed to design the GL1 in such a way that it has a very pleasant timbre, with good sustaining qualities, making it ideal for chordal playing.
It’s also impressively loud for a small instrument, so projection isn’t really an issue unless you’re playing in an ensemble situation, then a pickup might be desirable.
If you’re looking for a flat sound for blues picking, for example, this might not be your ideal choice.
Equally, if you’re looking for a quiet practice instrument, this might not quite fit the bill.
As a general all rounder, though, the GL1 is a very capable instrument and is unlikely to disappoint for the modest outlay needed to purchase one.
Yamaha GL1 Construction
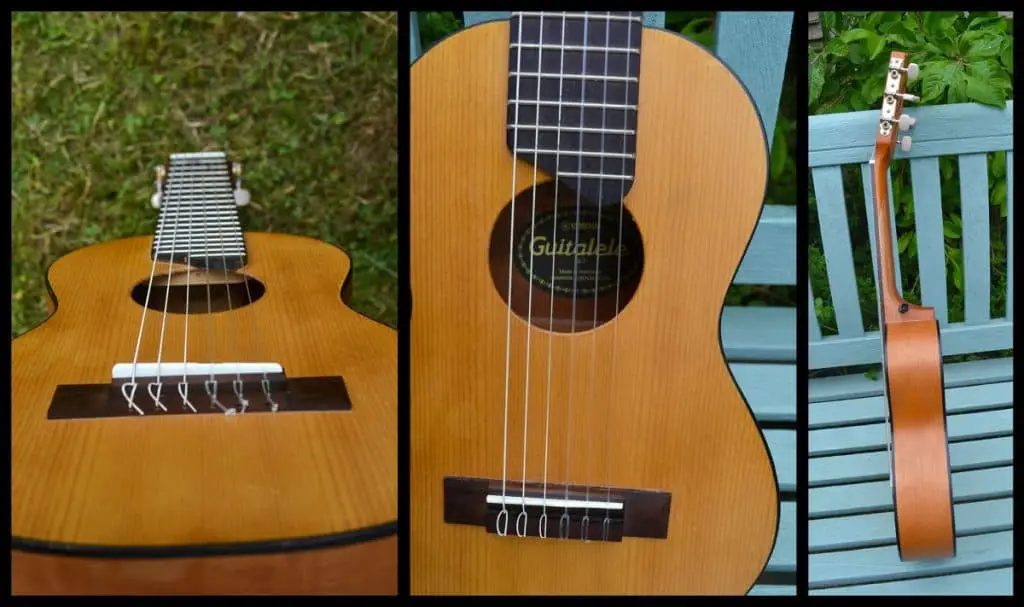
The GL1’s top, back and sides are unsurprisingly constructed from laminate woods, reflecting the manufacturing cost of an instrument in this price range, but don’t be put off unless you’re only in the market for an all solid wood model.
Many instruments in a higher price bracket also rely on laminates and in my opinion you can become too immersed in the belief that only solid wood instruments are worth considering.
The GL1 doesn’t have any strap buttons, but I would advise the addition of at least one on the bottom and possibly another on heel if you’re likely to be playing it standing up.
This is because it’s a little heavier than a tenor ukulele and quite awkward to hold for sustained periods without a strap.
I’ve included a “how to” at the end of this article on how to add the strap buttons and strap yourself.
Notes on the GL1’s Construction Woods

Back and Sides: Meranti Laminate (aka Lauan or Philippine Mahogany)
Meranti is a hardwood with a straight grain found in Southeast Asia. It varies in color from yellow to gray and ages to a golden brown hue after being exposed to sunlight for extended periods.
Meranti is a popular wood with manufacturers of lower-priced instruments because of its availability, cheap harvesting and easy workability.
On the Janka hardness scale (lbf or pounds of force) it rates around 800-825 mark.
Neck: Nato (aka Eastern Mahogany)
Nato is a wood with very similar tonal properties to Mahogany.
It’s used regularly as a replacement for the more expensive and harder to source Mahogany.
It comes from a wider species called Mora or Mora Excelsa, and comes in at 2,300 lbf on the Janka scale.
Bridge: Sonokeling
Sonokeling is virtually identical to Indian Rosewood and is sourced locally in Indonesia by Yamaha’s Indonesian manufacturing plant.
The color of this particular species varies from a purply hue to a striped brown.
The wood has open pores that are visible if you look closely at the grain. A light oiling of the fingerboard might be advisable, but use a natural product such as linseed or mineral oil and NOT a petroleum-based product!
Example Guitalele chords for the Yamaha GL1
Here’s a selection of chords for the Yamaha GL1 guitalele for you to try out.
The chords are rated in key and difficulty order as follows:
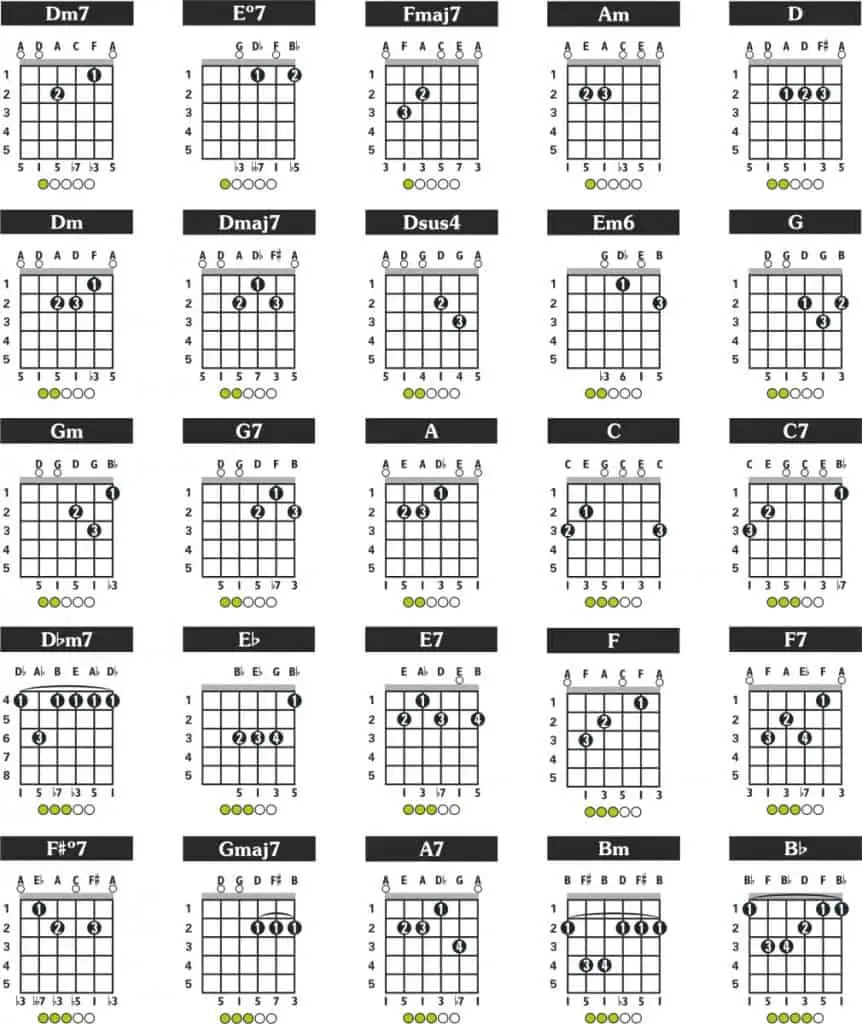
A fully comprehensive collection of guitalele chords can be found in my book, ‘The Guitalele Chord Bible’ (Available on Amazon).
Best Strings for the Yamaha GL1 Guitalele
Strings are very much a personal thing, but here are a few suggestions you might like to try that I recommend, along with links (where applicable) to buy them:
- Aquila 96C Guilele – Available on Amazon
- Aquila 133C Guilele Reds – Available on Amazon
- D’Addario Folk Nylon EJ34 – Available on Amazon
- D’Addario Pro Arte J450 series (Zyex composite core)
You can also use a combination of varying classical guitar strings suitable for a ¼ size model.
Consult your local stockist and specify it’s for ‘A’ and not ‘E’ tuning.
What’s the Best Hard Case for the Yamaha GL1?
If you’re travelling locally, a gig bag should be sufficient (and the GL1 often comes with one), but if you’re taking your guitalele on a flight, a hard case is more advisable.
In my opinion, good choices for hard GL1 cases are:
- Cordoba Tenor Ukulele Gig Bag – Available on Amazon
- Guardian CG-020-UT Hardshell Tenor Ukulele Case
- Kinsman KUT14 Gig Bag
- Lanikai Hardshell Tenor Ukulele Case – Available on Amazon
As a general rule, I’d always advise buying instrument cases from a physical music store if you can. Then you can take your instrument along to make sure it fits properly.
Another point to consider is if you’ve installed a strap button on the bottom, things might get a little tight.
Anything smaller than a tenor uke case and it’s unlikely to be a very good fit. Using a baritone ukulele case is also an option, but you might it a little too big for the guitalele on some models.
Capo and Tuner Recommendations for the Yamaha GL1
An electronic chromatic tuner is a must-have accessory in my opinion.
Very few of us are equipped with perfect pitch and don’t always have a piano on hand to tune to.
My go-to choice for tuners has always been the Snark range. A good model for the GL1 would be the Snark SN6X Clip-On Ukulele Tuner.
Another important addition to your guitalele arsenal is a capo. Be sure to select a model for a flat fingerboard and not a convex one.
Manufacturers to look out for are Shubb, Kyser and Wingo – like this pair you can get on Amazon. If you’re on a budget, there are a lot of very adequate minor brand models for only a few dollars.
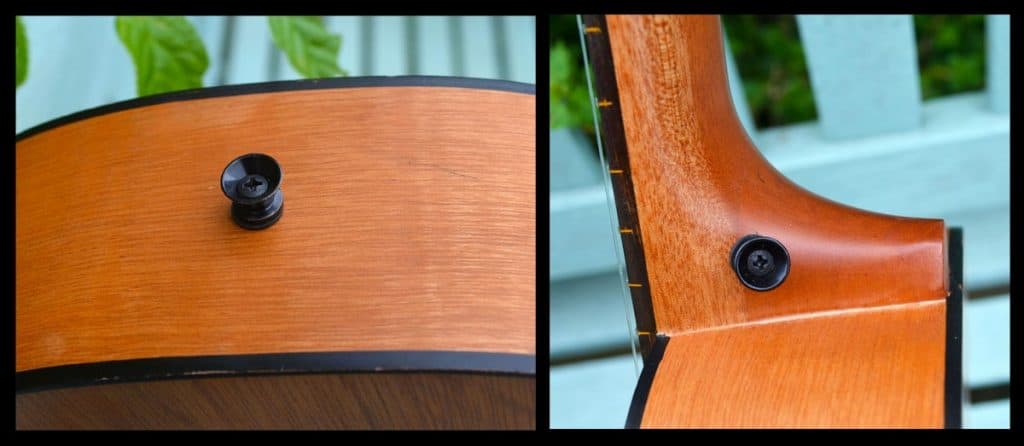
Fixing a Strap (And Buttons) to Your Yamaha GL1 Guitalele
If you want to attach a strap, you’ll need a couple of strap buttons. These generally come in three basic colors: chrome/silver, brass/gold or black.
Aesthetically, I think black is a good choice to match the black purfling or binding around the body.
If you feel confident enough to install the strap buttons yourself, it’s a pretty easy job if you’re used to handling a drill.
Here’s how I added a strap to my GL1:
- Stick a strip of sticky tape or masking tape in the dead center of the bottom of your instrument and mark it accurately with a fine marker or ballpoint pen.
- When you’re fully satisfied that it’s central, use a bradawl to make a tiny indentation for your drill bit to key into.
If you don’t do this, the drill bit will probably slip as you drill and scratch your instrument. - Ideally, gently clamp the guitalele between the jaws of a portable workbench, but not too tightly for obvious reasons.
I should add I take the slightly more adventurous route of gripping instruments between my knees while I drill. No accidents yet, but you have been warned! - One word of caution is you must choose a suitably sized drill bit and I can’t emphasize this enough – test it first on a piece of scrap wood to check you have the diameter of the strap button’s screw correct.
I invested in a set of small gauge drill bits for this very purpose. A serviceable set like this can be obtained from Amazon for a few dollars. - The hole needs to be snug enough so the screw thread doesn’t wobble around and pull straight out and yet not too small that you’re applying too much effort screwing it in. A bit of common sense is in order here.
- If you want to install a further strap button on the heel, it’s better to locate it just below it or possibly in the center. NOT above or the strap or it will easily pull off without strap locks.
Here are a couple photos showing how I’ve attached the buttons to mine:
Simple Saddle Adjustment for the Yamaha GL1
For the more intrepid amongst you, it’s a simple D.I.Y. job to reduce the height of the saddle on your fretted instrument.
Here’s how I did it:
- Firstly, you need to take a measurement around the 12th fret of the guitalele and see how many millimeters need removing to improve the action enough to make playing a more comfortable experience.
- In the model I’m testing, it’s around 1.5mm. You may be able to slacken the strings enough to slip the saddle out without removing them completely.
- When it’s been removed, mark 1.5mm (or whatever you’ve decided) on the bottom of the saddle with a sharp pencil or very fine-tipped marker.
- Repeat this on both ends and join the lines up so you have a continuous line going around the bottom of the saddle.
- Get a sheet of medium to fine grade sandpaper and tape it down onto a flat surface. Now, using both hands in a pinch grip with index fingers and thumbs, hold both ends of the saddle and begin slowly wearing away the bottom section of the saddle until it reaches the line you’ve drawn.
- It’s important that even pressure is exerted on both ends of the saddle or it’ll end up with one end higher than the other, so do this gently until the line is reached.
- When you’ve finished sanding it, slip it back into the saddle slot and re-tighten the strings. You should see an instant improvement in the action.
It’s always better to take off too little at first because if you remove too much, you’re likely to cause fret rattle from the first few frets.
If you don’t feel confident enough to try this, take it to your local guitar shop or luthier, who will probably have an in-house guitar tech service. It’s a simple job that will take them twenty minutes at most.
If you find the nut is a little high, this is a trickier job than sanding the saddle down. It involves either deepening the slots in the nut or sanding the bottom of the nut to reduce the height at the first fret.
This requires a higher level of experience and a set of nut files. So, if you haven’t done any guitar maintenance work before, this probably isn’t where to start.
Ideally, the GL1 guitalele could do with around a .75mm height reduction, but it’s not too bad.
Conclusion
Have I reached a conclusion regarding whether it’s a small guitar or a 6-string ukulele? In the end, it doesn’t matter a great deal either way, so it’s probably sensible to place it solidly in its own category.
Guitarists and Ukeists will find the GL1 layout quite familiar after noodling around with it for an hour or two and anyone starting from scratch can equally get to grips with it fairly quickly.
Although it’s a relatively new instrument, instruction manuals and internet playing guides are readily available, so you won’t be taking a giant step into the unknown when you get it home.
For the techies amongst you, I’ve detailed the specifications below.
Yamaha GL1 Guitalele Spec
Manufactured: Indonesia
Model Numbers: GL1 / GL1 BK / GL1 PB / GL1 TBS
Accessories: Gigbag
Back & Sides: Meranti Laminate (aka Lauan or Philippine Mahogany)
Body Depth: 2 13/16” / 7cm
Body Width: 9” / 22.9cm
Bridge: Sonokeling
Colors: Natural / Black / Persimmon Brown / Tobacco Sunburst
Fingerboard: Sonokeling (aka Indian Rosewood or Dalbergia Latifolia)
Finish: Matte
Frets: 18
Headstock: Slotted
Length: 27.5” / 70cm
Neck: Nato (aka Eastern Mahogany)
Neck Width: 1 7/8” / 4.75cm
Nut: Plastic
Nut Width: 1 7/8” / 4.75cm
Saddle: Plastic
Scale Length: 17” / 43.3cm
Size: ¼ (in guitar sizing)
Strap Buttons: Not included
Strings: Nylon (unbranded stock strings)
Top: Spruce laminate
Tuners: Geared
Tuning: A-D-G-C-E-A